
Perhaps you are like me. A "plus sized" gal with the added bonus of melon-like breasts. If I go by measurements alone there are really no patterns out there in our indie pattern world that I should be sewing. Certainly none that do not offer a personalized tent to my wardrobe. This happens even in ready to wear items. I get something large enough for my chest and then feel frumpy at best.
Pattern designing is a complex process and in reality can not cover every single body type. I do not expect that of our designers. Did you know that patterns are developed and graded for an average "B" cup? Now by today's standard, that is a cup on the smaller side. With (it seems) more and more women in our sewing communities more in the range of multiple D, E, F, G and beyond cups this has become a "real" issue to more than a few. Many of us have breast measurements that fall outside the sizing charts of the patterns and feel we are "out of the game". However, I have learned that is not necessarily the case! I can use several patterns my bust is too large for (by chart), adapt and feel fabulous! I want to share that with all of you today and open up a new world of patterns that will work for you and fit as well! Please grab a cup of tea or your favorite glass of wine and hang out for a few minutes with me as I explain.
I often work with the fabulous Katie Wilson of Duck Butt Designs in testing kids patterns for my little gang of goblins. This time she did a call out for testers of the new women's BLAST top and I noted that I was right close to the top range of chest measurements (you know, depending on what bra I wore). I decided to give this one a whirl as I was in desperate need of some new clothes and I really gravitate to necklines that are not the typical crew/rounded neck to help take away focus on breast size.

I will be honest. My first attempt was a "bust". See what I did there :)
As you can see, by going by my bust measurement size only, I ended up with a very sloppy neckline and excess in other areas as well. It was not a garment that I was going to feel fabulous in and it was in no way Katie's fault. The pattern was well graded but my body defied the "standard". I admit, I felt a bit defeated.
In our testing group the ladies began chatting up FBA. A few of our "smaller" girls were doing them. I admit, having not sewn many tops (other than the intentional tent looking type) I had not delved much into the world of FBA. It was time. I had to make this work. I could not fail. Not even so much for myself, but for my wonderful friend who had shared so many opportunities with me. It was time to step outside of my comfort zone and slay this breast...err beast.
So what is FBA?..."Full Bust Adjustment". It is a pattern alteration that allows you to use a smaller size for better fit in shoulder and neck areas while allowing room needed for your breasts. There are some techniques that you may already be familiar with...for example a dart. A simple way to add a little bit more fabric at the breast apex. Sometimes a dart is not desirable, or does not give you enough additional room. Let's talk about how we can make this work.
My first, and perhaps most important suggestion is to PLEASE take a bit of time out and go get yourself properly fitted for a bra at a specialty shop where it is all that they do. It honestly makes a word of difference and is a necessity. I did a blog post a couple of years ago that talks about a fitting experience. Now reviewing it, I am reminded it is time to go again as I gained some of those lost pounds back. Please have a read.
 |
| Image from AAH Intimates Blog |
This Bare Necessities page has a great overview as well as has a video on measurements and cup sizing. I want to really stress that an "in person" fitting is important and allows you to try on a range of brands and sizing options. Perhaps viewing this will show you that you NEED a fitting. Pro Tip: Get the "professional fitting" and find out the style, brand and size that fits you and makes you feel fabulous, then get your additional bras at an online retailer to save dollars. I typically buy one at the store who has helped me, then search out online options for the balance of my wardrobe.
To get great fit we need some measurements relating to our bust area.
Bust: The fullest part of your bust with tape measure level.
 |
| Image courtesy of Katie Wilson Duck Butt Designs |
Breast Apex: From top of shoulder down to the apex (nipple) of your breast
Across Shoulder: From the top of the ball (point) of your shoulder to the mid point of your neck
Apex Distance...the measurement from nipple to nipple.
If you have a difference of more than a few inches between your over bust and bust or a size difference indicating larger than a C cup, I suggest you consider a FBA.
Now lets determine the size you should sew. On the size chart plot your bust, across shoulder and waist. If there is a size difference between your bust and shoulder measurement sizes, plot your over bust in the the bust column. This should be closer to your shoulder measurement and more proportionate and helps to separate actual body size from bust. The neckline of this pattern makes the shoulder measurement of particular importance.
 |
| Sizing Chart sample from Duck Butt Designs |
In my personal example my measures were:
Full Bust 56
Over Bust 45.5
Waist 46
shoulder 9 1/4
Chest 8
We ended up choosing to do a size 20 (closest to the shoulder measurement) with FBA. My difference is 8 inches between my actual bust and the bust measure for the size selected.

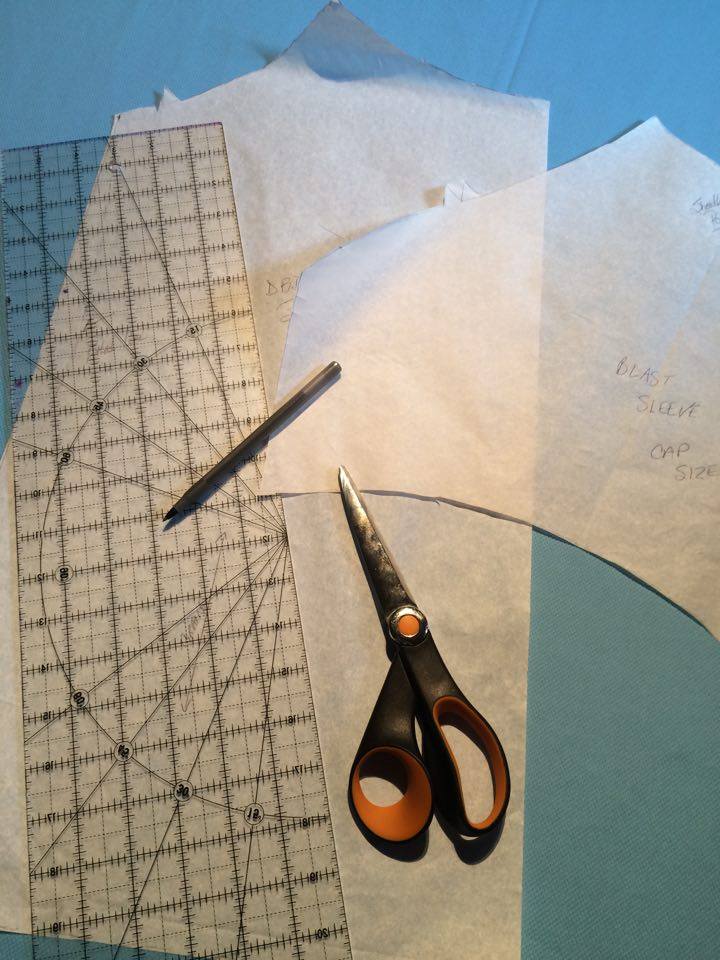
Now that we have a size to work with, lets begin the magic! Print off the pattern in the required size and ensure your scale square is correct. Gather some extra paper, a ruler, marker and paper scissors. I am a tracer, so you are going to see my traced piece in the following photos. While this pattern is equipped with layers, I typically print all sizes and trace. It is just a preference thing. Pro tip: If you alter or trace patterns often, purchase medical exam paper by the roll. It is economical and fits the job needed perfectly!
Take your Breast Apex measurement and transfer it to the pattern. On this pattern this is a bit tricky as the front does not go all the way up to the shoulder. As a result, you are going to find the mid point of your sleeve (the top of shoulder) by folding it. Mark that point. Place the sleeve beside your bodice front piece with seams aligned. From the mid point you marked, measure down the pattern the length of your Breast Apex Measurement. This gives you the height of the apex. Now take your Apex Distance Measurement and halve it and use that to measure in from the center front. This cross section of points should give you where a reasonable estimation of where your nipple sits relative to your pattern piece.

Sleeve on left meeting up with top of front piece, measuring down to mark apex.

Measuring in from front center for second apex measurement. Plot the dot on the line that was determined form measuring the shoulder down.

Apex determined.


Here we show how a small amount is left attached at the apex from the side seam.
This is where there is a bit of "wing and a prayer" stuff that goes on. If we were using woven fabric then the "rules" are fairly straight forward. Make your FBA at a rate of 50% per side or 100% total of the difference of measures....your full bust and the bust of the pattern size. You then get the full amount needed across both sides of the front with this "stable" fabric.
We however are making a FBA with knit fabric that has a fair amount of "give and forgiveness". We actually WANT the fabric to cling in all the right places and if we did the FBA at 100% you would end up with excess droop and sagging...which is EXACTLY what we are trying to get away from! What we want is some "negative ease". I personally started at about 60% (5 of 8 inches total) and was using 95/5 cotton lycra. If you were using a more stable knit like 100% cotton interlock you would want less negative ease for a good fit (perhaps 7 inches of 8 total) . Pro tip: With all of this in mind, please DO NOT use your favorite custom knit that you paid $50/yd aftermarket for because you.had.to.have.it. Use a less expensive cut (solids perhaps) with the same fiber content and stretch as a "muslin" or "tester" to ensure a good fit first.
 So let's tackle an example in photos. You have a difference of 4 inches between your bust and the bust measurement of the pattern. First lets go with a negative ease of about 2 inches . This brings us to needing 2 inches in the bust. Half of that is an inch on each side. This is the amount we want to make the pattern bigger.
Rotate your pattern piece to create a 1 inch gap. Note that the armscye stays constant as it is still joined. This is the reason we did not cut through fully.

 This is what our pattern piece now looks like. There should be sufficient room to accommodate the breasts while having a well fitting neck line and shoulder area.
 Fix the lower hem line by blending the bottom piece. You do not want to cut off the bottom as you would loose the extra you just added. You then proceed to cut pattern pieces as instructed in the instructions. When you sew, ease the additional gap at the side seam like you would a sleeve.

If you have a more ample breast area (more than 4 or 5 inches) between the bust and pattern bust measurement, we need to utilize a slightly different technique to create enough room in the FBA. As you can see if we were to do just the method we just did, the sleeve attachment gets pretty crazy and the curve is completely lost.
In this case all the measurements and marking transfers are the same as the above example. This time however, we do cut right through from the side to apex. We leave the armscye intact as above though.

To create the excess room needed in the bust that can not be created in slash and swing that works from the armscye , we use the side seam split and drop. By dropping down that portion of the pattern more room is added at the side of the breast. Join the side seams with a slightly rounded line which again gives just a little bit more room. How much you drop, depends on the need. This example is based on my personal measurements. I had a total of a 8 inch difference between my over and full bust. Add in a negative ease estimate of 3 inches, I need a total of 5, then halved for each side of the front, so 2.5 inches. As you can see I gained 1.5 inches in the slash and rotate portion and an additional 1 inch in the side split and drop. Additionally I did a "rounded join" at the side seam to gain just a little bit more room. Since I downsized to a size 20 and my waist was at a 24, this also creates the additional room there as well without the need for grading further.

Construction takes an extra step to use this method. You now have a longer front side seam than back. This needs to be reduced by one of two methods. Mark the top and bottom of your "side seam drop" on your fabric.The first is to ease it in. For shorter distances this is the cleanest way to do the side seam. If you have a larger amount that is not going to ease without a "gathered effect" or overly stretching the back, utilize a reverse box pleat.


Finish the rest of your garment per the instructions.
As you can see, the fit in the shoulder area is MUCH better and the neckline sits nicely and has proper coverage by using a smaller size overall with a FBA. While this example was created for, and specific to Duck Butt Designs BLAST Shirt it can be used on any of Katie's women's knit fabric patterns. The key difference would be that we utilized the sleeve in determining apex because the pattern front did not extend up to the shoulder. It would also be able to be applied to many other designers patterns as well.

I hope that this opens up a whole new world of patterns for ladies who are on the "larger" side of sizing and whose bust fall outside of the measurement charts. Taking an upper bust measure into consideration to more accurately determine BODY size and utilizing a FBA for BREAST size, it is my hope that you can realize that there ARE several patterns out there that WILL fit you.

For those of you who feel a bit of "frump" by choosing a larger size and ending up with excess fabric in all the wrong places, I hope you can find your "I feel sexy" fit with this knowledge.

Shirt Pattern: BLAST Top by Duck Butt Designs
Skirt Pattern : Sassy Pocket Skirt by Duck Butt Designs
Fabric: Stache Basics Collection by Fabric Stache (Shannon)
Sewing and Model: Michelle Racher


No comments:
Post a Comment